Wednesday, 29 October 2014

♥ Australis AC ON TOUR Contour & Highlight Kit ~ Review ♥


Hey beauties!

After seeing so many people on Instagram going insane about the new Australis AC ON TOUR contour and highlight kit (c on tour? I see what you did there Australis haha!) I decided to pick it up for myself! It's absolutely crazy the resemblance between this and the Anastasia Beverly Hills Contour Kit which is the obvious reason as to why everyone is so excited! With the ABH Contour Kit priced at AU $70.00 and the Australis costing AU $16.95 this product is already a winner in my eyes! I think its quite unusual for this much hype to develop around a drugstore product so I just had to see what all the fuss was about and I'm SO glad I did!

The Australis AC ON TOUR contour and highlight kit can be purchased either on the Australis Cosmetics website or in Priceline, both these locations however have been sold out since it's release so keep an eye out for when they restock! A major plus about this product is that it's NOT a limited edition which I had initially thought, which is fantastic because now we can all get our hands on this little gem! I have been playing around with this palette a few times now so I thought I would do a review for you guys for anyone who is considering purchasing this and would like to see swatches and my thoughts! 

(Sorry about the grubby marks)

The packaging of the Australis contour and highlight kit is really simple and features gorgeous pink and black exterior. I think the packaging is quite sturdy despite it being plastic. Something which I love about the packaging is that Australis has included a little 'how to' guide on the back showing how to apply the contour and highlight shades, this is great for beginners and is a nice little touch.


 The Australis Contour and Highlight Kit do not have names for the contour and highlight shades however use numbers instead. I'm honestly not too bothered about shade names as most drugstore products use numbers and for the price of this baby I'm not going to complain!

The top row includes three highlight shades; the first being a matte pink/cream toned powder which I have been using to set my makeup and it doesn't do a bad job either! Obviously It's not something id reach for to powder my face everyday but for travelling its pretty useful to have. The middle shade is my favourite of all three highlight shades, a matte yellow toned powder (also referred to as a 'banana' powder) which ive been obsessed with for setting my under eye concealer as it brightens the eye area and makes me look more awake (I'm currently rocking the Godzilla look due to year 12 assessment haha!) The final highlight shade is a shimmery warm beige highlight which gives a gorgeous natural glow when applied to the cheek bones, I actually really love this highlighter!


The bottom row features three contour shades which are all matte. The first contour shade is a really warm brown which I love to use for bronzing up my face. The middle shade has to be my favourite contour shade due to the grey undertones. As a pale girl It's really hard finding a contour shade which doesn't look muddy and orange so this shade is perfect for creating a really natural looking shadow! The third shade is an earthy toned reddish brown, this will probably be the shade I get the least use out of. 


The AC ON TOUR contour and highlight kit is amazing for the price and the quality really surprised me! Both the contour and highlight shades blend seamlessly and are so versatile for different skin tones. This would also be a great palette to take travelling or for beginners as it essentially includes a face powder, under eye setting powder, highlighter and three bronzer's, what's not to love! This palette is extremely pigmented and so I would recommend being light handed and slowly building up the shades as they do blend beautifully.

 I HIGHLY recommend you pick up this palette if you have the opportunity! Well done Australis you've got my approval! Let me known down below If you've tried the Anastasia one and how it compares!


Sarah xx


Saturday, 25 October 2014

♥ My Mini NARS Collection ♥


Okay, I'm officially addicted to all things NARS! As a long time lover of MAC I never thought I'd fall in love with any other brand however one thing led to another and one NARS purchase turned into two then three, and BAM! NARS is my new favourite brand! 

The following is my current small NARS collection! I really hope to purchase more from NARS as I'm constantly impressed by the quality, the shades, the collections and just about everything else they have to offer! Unfortunately I live 2 hours away from the closest MECCA MAXIMA so having access to NARS is most difficult especially as I do not go up that way often! 


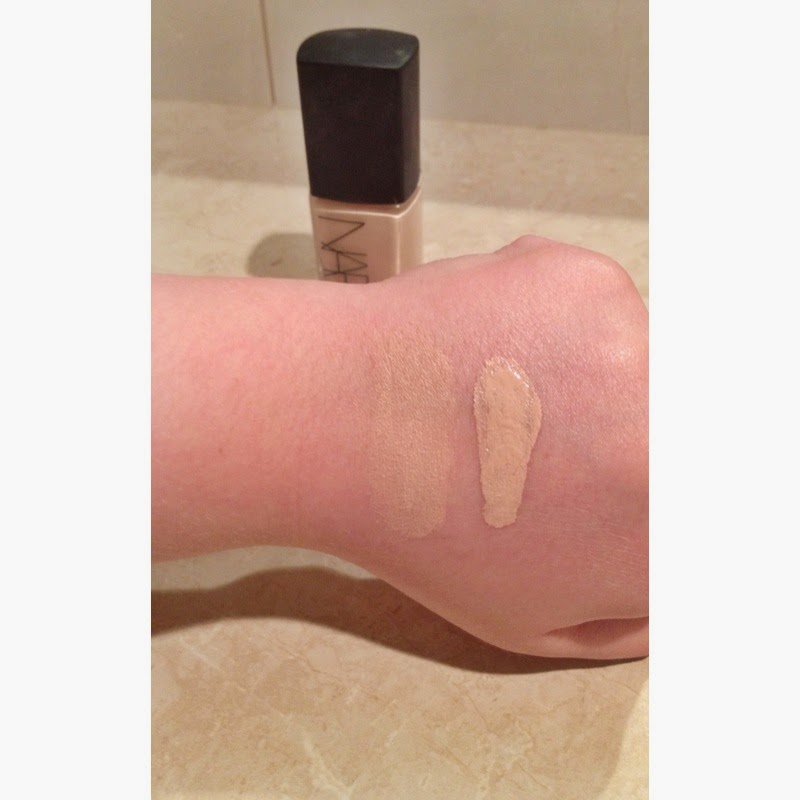
NARS Sheer Glow Foundation in MONT BLANC ~ $59.00 for 30ml


I had wanted to purchase this baby for absolutely ages however the price seemed a bit much for me. Thankfully MECCA MAXIMA had their amazing price drop and the price for sheer glow didn't seem nearly as scary and so I made the plunge (into my pockets)! Before purchasing sheer glow I was obsessed with Revlon Colourstay and swore by it, however after talking to a nice girl at MECCA she explained kindly that it looked quite cakey and orange on me! I then got matched to sheer glow and tried it on in store and immediately fell in love with the gorgeous medium coverage, dewy finish and the fact that it matched me perfectly! This is my current favourite foundation and really love the healthy glow it offers! Despite having oily skin I don't find the dewy finish a problem at all! My only complaint about this product is the fact that it does not come with a pump and I totally forgot to pick one up in store when I went! I will definitely be picking up one next time I go! 


 NARS Blushes ~ $39.00 for 4.8g 

Super Orgasm ~  This was my first ever NARS purchase which hooked me onto the brand! This blush is absolutely gorgeous, it's described as 'peachy pink with gold glitter'. I really like wearing this blush out on special occasions as the gold looks stunning when the light reflects my face! It's quite an intimating blush on first glance however it gives such a gorgeous glow and the colour is quite subtle compared to the other NARS blushes. This one is definitely more of a going out blush rather than an everyday blush due to the amount of glitter however if I do wear it out to the shops I get so many compliments! 

Deep Throat ~ I am so glad I picked up this cult favourite because it's now my go-to everyday blush! I can see why everyone raves about deep throat (don't you just love the awkward names!) Deep throat is described as a 'sheer peach with shimmer'. Its definitely a gorgeous peachy pink shade however the shimmer is very subtle which I think is perfect for everyday wear! Deep Throat really compliments my pale skin which I find hard sometimes as many blushes are just too much and make me look like I just peed my pants and am blushing severely! I love the gorgeous glow Deep Throat gives to my skin and these blushes seriously stay on ALL DAY and don't budge!


Swatches ~ Super Orgasm (left) and Deep Throat (right)


And there you have it, my small but growing NARS collection! I am totally obsessing over NARS and would LOVE to try out some more of their range! Especially their lipsticks, Laguna bronzer, highlighters, concealers and some of their brighter blushes! THANKYOU NARS for being amazing!

Have you tried anything from NARS?  Let me know your thoughts down below! Thankyou!

Sarah x


Wednesday, 15 October 2014

Makeup Of The Month ♥ Natural Makeup

I'm dusting off my keyboard and brain storming new ideas! That's right, you heard me, I'm back in business! 

After many months of abandoning my blog due to year 12 school work, I'm finally able to return to what I love most, blogging! And to start fresh I thought what better way than to start a new series called 'Makeup Of The Month' This mini series will see a new look each month from vampy goddess to a sexy sultry look!

In each look I will be listing all the products I used along with the steps to how I achieved it! This month I created a gorgeous neutral look which is perfect for an everyday basis. So keep on reading if you want to see how I achieved this months look!


Step 1: Primer - Of course the first step to creating a flawless base is primer. For this look I used the Bareminerals neutralizing foundation primer all over my face to even my skin tone and smooth any imperfections.

Step 2: Foundation - As I wanted a fairly matte finish for this look due to the fact I have crazy oily skin, I used the Covergirl 3in1 stay fabulous foundation in 810 which I applied with my Real Techniques buffing brush. 

Step 3: Concealer - Next I took my MAC Pro Longwear Concealer in NC15 and created a triangle shape under my eyes to highlight, I then pattered it softly into my skin with a damp beauty blender. To set my concealer I used my favourite drugstore under eye powder, the Elf HD under eye setting powder. 

Step 4: Face powder - Of course I set the rest of my face using my holy grail face powder,  MAC Studio Fix in NW13 with the Elf kabuki brush. I made sure to go easy with the powder however as im going for a very natural look!

Step 5: Cheeks - For bronzer I used my holy grail Benefit Hoola Bronzer which I lightly applied on the hallows of my cheeks. For blush I used my favourite natural everyday blush, Nars Deep Throat, and then to finish off my cheeks I added some of the gorgeous Mary Lou-Manizer from The Balm for a gorgeous glowy finish.

Step 6: Eyebrows -  For eye brows I used a great drugstore eye brow kit, the Elf eye brow kit in medium and I just used the gel to shape and fill my brows. A great tip which im obsessed with doing is cleaning up my brows with a concealer. For mine I used the LA Girl Pro Conceal in Classy Ivory and I simply just put this on the lower part of my brow to give it a cleaner looking appearance.

Step 7: Eyes - The eye look is ever so simple as I only used three shades and they were all out of the Lorac Pro Palette. Firstly I took cream and applied this all over my lid, then with a fluffy blending brush I applied taupe to my crease, finally finishing off with a dab of nude on my inner corner to brighten up my eyes. I then completed this eye look by applying two coats of Benefit they're real mascara. 

Step 8: Lips - Finally to finish the look I used MAC Velvet Teddy which I think goes absolutely perfect with this look!

And we are done! I hope you enjoyed this months 'Makeup Of The Month' post and keep an eye out for next months!

Sarah xx